
Over the years, I’ve refined my options trading into a disciplined, rules-based framework with one primary objective: consistently selling premium while managing risk.
The Kickass Strangle isn’t about predicting where the market will go next. Instead, it focuses on identifying high-probability trading ranges, positioning the Profit Zone accordingly, and allowing time decay (theta) to work in your favor.
The strategy combines clearly defined rules with technical analysis. Entry timing, premium targets, position sizing, profit taking, defensive adjustments, and risk limits are structured and repeatable. However, the strategy is not completely mechanical. Some discretion is required when evaluating market structure, interpreting the charts, selecting strikes, and determining how aggressively to skew the Profit Zone.
This playbook outlines the framework I use to construct, manage, defend, and exit a Kickass Strangle.
What Is a Short Strangle?
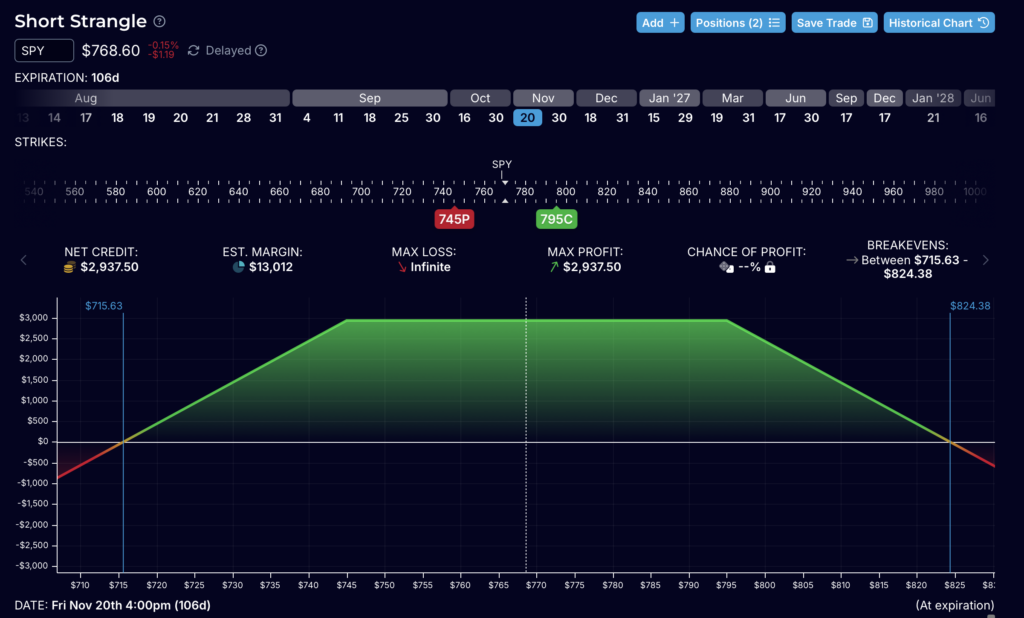
Figure 1. Basic construction of a short strangle showing the short put, short call, and the profit zone between the strikes.
A short strangle consists of:
- Selling one out-of-the-money (OTM) put.
- Selling one out-of-the-money (OTM) call.
- Both options share the same expiration date.
- Both options are sold simultaneously for a net credit.
The initial premium collected represents the maximum potential profit of the original unadjusted position if both options expire worthless.
The goal is for the underlying index to remain between the two short strikes while option values decay over time.
Unlike many short strangle strategies that rely solely on option Greeks, the Kickass Strangle combines technical analysis with premium-based strike selection to improve where the trade is positioned.
The Kickass Difference
Trade the Price. Let the Chart Determine the Skew. Let Delta Be the Result.
Many option-selling strategies begin with a predetermined delta—for example, selling a 10-, 15-, or 16-delta put and call.
The Kickass Strangle takes a different approach.
Strike selection is driven primarily by price and premium, not by a fixed delta target.
The objective is to collect a predetermined amount of premium based on the selected expiration while positioning the Profit Zone according to the technical structure of the market.
The chart determines whether the trade should have a bullish, bearish, or neutral skew.
For example:
- Bullish chart: Move the put strike slightly closer to the market or move the call farther away.
- Bearish chart: Move the call strike slightly closer to the market or move the put farther away.
- Neutral chart: Maintain a more balanced strangle.
Delta is evaluated after the strikes have been selected. It describes the resulting position but does not dictate where the strikes are placed.
In practice, the resulting strikes will often fall within the 5–10 delta range, but that is a consequence of the pricing and positioning process—not the objective.
Trade the price. Let the chart determine the skew. Let delta be the result—not the starting point.
Approved Index Products
The strategy is limited to highly liquid broad-market indexes and their corresponding futures and ETFs.
| Index | Futures | Micro Futures | Index / ETF |
|---|---|---|---|
| S&P 500 | /ES | /MES | SPX, XSP, SPY |
| Nasdaq 100 | /NQ | /MNQ | QQQ |
| Russell 2000 | /RTY | /M2K | IWM |
The strategy avoids individual stocks because company-specific events can create unpredictable price gaps. Earnings announcements, mergers, lawsuits, product announcements, and other events can overwhelm technical analysis.
Broad indexes provide diversification, deep liquidity, and a more consistent market structure for this type of premium-selling strategy.
Constructing the Kickass Strangle
Every position begins with the same basic process.
Step 1 – Select the Underlying
Select an approved broad-market index product based on liquidity, available capital, and position-sizing requirements.
For smaller or more precise position sizing, /MES and XSP can be used to build positions in smaller tranches.
Step 2 – Select the Expiration
The strategy uses two expiration tiers.
| Tier | Days to Expiration | Target Total Credit |
| Tier 1 | 60–90 DTE | $1,800–$2,000 |
| Tier 2 | 91–120 DTE | $2,500–$3,000 |
The expiration is selected first because the amount of premium available depends heavily on both time to expiration and current volatility.
Step 3 – Analyze the Chart
This is where the Kickass Strangle differs from many premium-selling strategies.
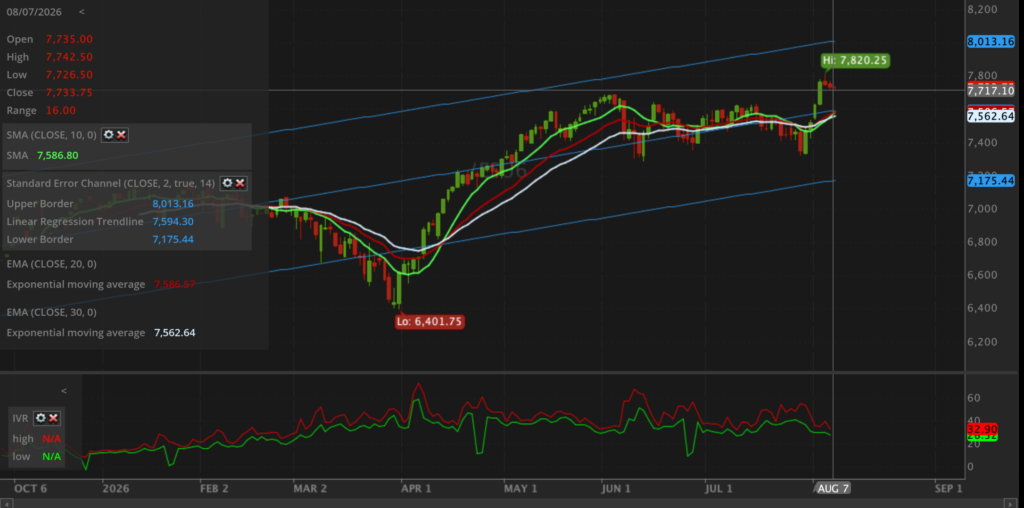
Technical Trade Alignment
Before selecting strikes, I evaluate the underlying using the following technical indicators:
- Standard Error Channel (Linear Regression)
- 10-period Moving Average
- 20-period Moving Average
- 30-period Moving Average
- Major support and resistance levels
My objective is not to predict market direction. Instead, I identify the market’s path of least resistance and position the Profit Zone where the underlying has greater room to move based on the current technical structure.
Positioning the Profit Zone
The Standard Error Channel serves as the primary tool for determining whether the Profit Zone should be positioned with a bullish, bearish, or neutral bias.
| Market Position | Market Bias | Strike Adjustment |
|---|---|---|
| Price near the Lower Standard Error Channel | Bullish | Move the put strike slightly closer to the market or move the call strike farther away. |
| Price near the Upper Standard Error Channel | Bearish | Move the call strike slightly closer to the market or move the put strike farther away. |
| Price near the Center of the Channel | Neutral | Maintain a balanced strangle with no directional bias. |
Step 4 – Sell the Put
Begin by selecting an out-of-the-money put.
Unlike many option-selling strategies, the strike is not selected by targeting a specific delta. Instead, the strike is chosen based on the premium (price) it contributes toward the desired total credit.
When selecting the put, consider:
- Current option premium
- Implied volatility
- Technical alignment
- Position of the Profit Zone
- Overall trade balance
The objective is to sell enough premium while positioning the strike outside the market’s expected path of least resistance.
Step 5 – Sell the Call
Next, sell an out-of-the-money call using the same expiration date.
As with the put, the call strike is selected based on the remaining premium needed to reach the target total credit—not by matching a specific delta.
When selecting the call, consider:
- Remaining premium required
- Technical bias
- Position of the Profit Zone
- Overall trade balance
The short call and short put do not have to be symmetrical. Strike placement is adjusted as needed to reflect current market conditions and technical alignment.The Profit Zone is intentionally shifted when market conditions justify it.
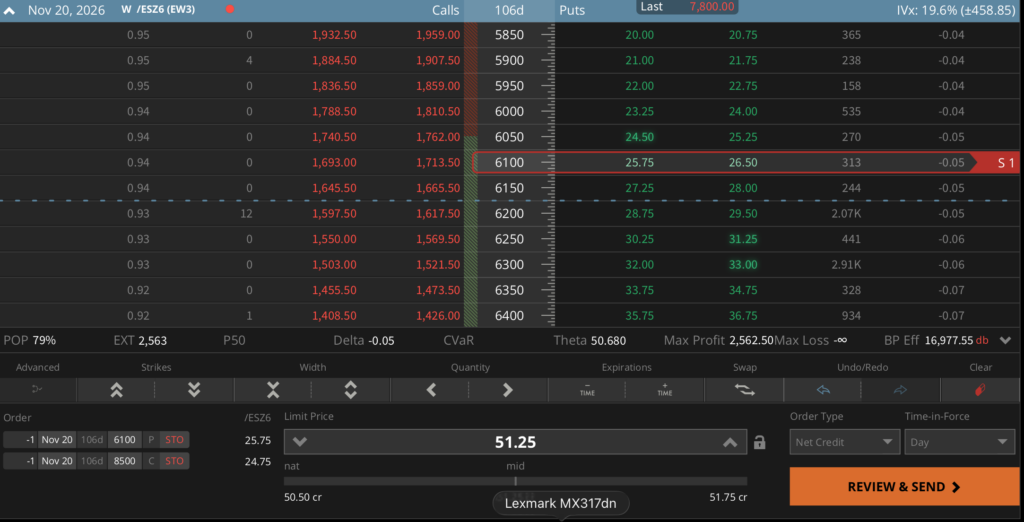
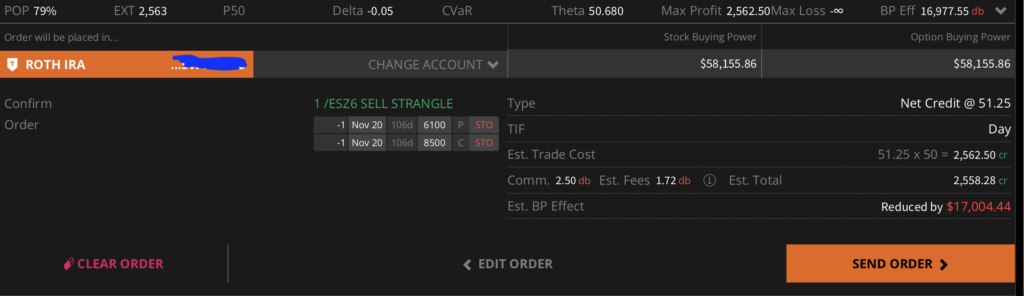
Step 6 – Verify the Total Credit
The combined premium from both options should meet the target credit.
Typical targets are:
| Tier | Days to Expiration (DTE) | Target Total Credit |
|---|---|---|
| Tier 1 | 60–90 Days | $1,800–$2,000 |
| Tier 2 | 91–120 Days | $2,500–$3,000 |
The important number is the total credit received for the strangle, not the individual premium of either option.
This is where price-driven strike selection becomes important. Rather than starting with a delta and accepting whatever premium is available, the process starts with the desired credit and works backward to determine where the strikes can be placed. Premium rather than fixed delta allows strike placement to naturally adapt to changing volatility.
In higher IV environments, strikes are generally farther from the market.
During lower IV environments, strikes move closer while still meeting the desired credit.
Entry Rules
A trade is entered only after the following conditions have been satisfied. Waiting for favorable market conditions improves trade quality and helps avoid entering positions during periods of excessive uncertainty or poor pricing.
Timing
A new position is typically entered under one of the following conditions:
✓ Wednesday around Noon Eastern
By midday, the market has usually settled from the opening volatility, bid/ask spreads have tightened, and institutional order flow has become more established. This generally provides more consistent trade execution than entering immediately after the market opens.
OR
✓ Following a market pullback of approximately 1%
A pullback often causes implied volatility to increase, allowing options to be sold at higher premiums and enabling wider strike placement for the same target credit. Rather than chasing the market higher, this rule encourages selling premium when fear temporarily increases option prices.
Volatility
Preferred:
IV Rank (IVR) of 30 or higher.
Higher implied volatility generally allows wider strike placement while maintaining the desired premium.
Position Size
Initial buying power should remain between 3% and 7% of total account value for each tranche.
Capital Management
Capital preservation comes before profit maximization.
Rather than entering a full position immediately, I build trades in tranches.
Benefits include:
- Greater flexibility to improve the overall position
- Improved flexibility
- Additional adjustment opportunities
- Reduced timing risk
If implied volatility expands significantly without threatening my strikes, additional tranches may be entered at wider strikes to improve the overall position.
Because SPAN margin expands during volatile markets, I maintain sufficient cash or Treasury reserves to absorb temporary increases in buying power requirements.
Managing Winning Trades
Winning trades are managed mechanically.
| Situation | Action |
|---|---|
| 50% of original credit captured | Close |
| 20–25% profit during first week | Close early |
| 21 Days to Expiration | Close or Roll |
Closing trades early reduces gamma exposure while allowing capital to be redeployed into new opportunities.
Managing Losing Trades
Adjustments begin before the trade becomes critical.
Adjustment Trigger
Begin evaluating adjustments when the tested side reaches approximately 30 Delta.
Adjustment Process
- Leave the tested side unchanged.
- Roll the untested side closer to the market.
- Target approximately 15 Delta.
- Collect additional premium.
Never Roll for a Debit
Every adjustment should produce either:
- A net credit
- Or, at minimum, break even.
The objective is to improve the trade’s probability without adding additional capital.
Final Defense
If the market continues to trend, roll the untested side to the tested strike, converting the position into a short straddle and maximizing the remaining extrinsic value.
Hard Exit
Every trade has a predetermined maximum loss.
If the total unrealized loss reaches approximately two times (2x) the original premium collected, the position is closed immediately.
Capital preservation always takes priority over attempting to recover a losing trade.
Performance Snapshot
Historical observations from my 2026 trading log:
Based on my 2026 performance logs, the Kickass Strangle Strategy has maintained a 100% win rate across all index-based occurrences. Below are your specific /ES Strangle trades pulled from the Travel and IRA account logs, all of which are recorded as winning positions.
Current /ES Strangle Results: 8 Closed Winners, 3 Open Positions Currently Tracking Profitably
Closed Trade Win Rate: 100%
These results are a very small sample size and reflect historical performance only. They should not be interpreted as a guarantee of future returns.
| Trade Date | Account | Opening Credit | IVR | Entry DTE | DIT | Net P/L | Premium Capture |
|---|---|---|---|---|---|---|---|
| 6/15/26 | Travel | $2,225.00 | 35.66 | 95 | 21 | $1,016.52 | 46.07% |
| 6/15/26 | IRA | $1,862.50 | 35.81 | 67 | 17 | $804.02 | 43.62% |
| 6/16/26 | Travel | $1,725.00 | 36.32 | 66 | 17 | $856.52 | 50.14% |
| 6/16/26 | IRA | $1,950.00 | 36.32 | 76 | 21 | $966.52 | 50.00% |
| 6/22/26 | IRA | $2,100.00 | 41.30 | 54 | 22 | $1,041.52 | 50.00% |
| 7/7/26 | IRA | $1,975.00 | 32.04 | 73 | 24 | $981.52 | 50.13% |
| 7/8/26 | Travel | $1,950.00 | 36.57 | 72 | 23 | $966.52 | 50.00% |
| 7/13/26 | IRA | $2,026.00 | 36.47 | 78 | Open | ||
| 7/17/26 | IRA | $1,900.00 | 43.51 | 63 | 17 | $941.52 | 50.00% |
| 7/23/26 | Travel | $1,787.50 | 50.60 | 85 | Open | ||
| 7/29/26 | Travel | $2,487.50 | 50.91 | 93 | Open |
*Note: Positions marked as “Open” are currently tracking as wins based on the log’s outcome indicators.
Key Performance Snapshot
- Average DIT of closed positions: approximately 20 days Summary
- 11 total /ES strangle occurrences
- 8 closed positions
- 8 closed winners
- 3 positions currently open
- Closed-trade win rate: 100%
Quick Reference Checklist
Before Entering a Trade
✓ Approved index product
✓ 60–120 DTE
✓ IV Rank 30 or higher (preferred)
✓ Standard Error Channel evaluated
✓ 10, 20, and 30-period moving averages reviewed
✓ Support and resistance identified
✓ Profit Zone aligned with the market’s path of least resistance
✓ Target premium achieved
✓ Buying power within the 3–7% rule
✓ Wednesday Noon Rule or 1% Pullback Rule satisfied
Core Principles
The Kickass Strangle is built on a few simple ideas:
- Trade only highly liquid index products.
- Let premium determine strike selection rather than fixed delta targets.
- Use technical analysis to align the Profit Zone with the market’s path of least resistance.
- Scale positions conservatively using tranches.
- Take profits consistently rather than chasing every dollar of premium.
- Defend positions according to predefined rules, not emotionally.
- Preserve capital above all else.
The market cannot be predicted with certainty. The goal of the Kickass Strangle is not to forecast where prices will go—it is to consistently place high-probability trades, manage risk with discipline, and allow probabilities to work over a large series of occurrences.
The Bottom Line
The Kickass Strangle is built around a simple philosophy:
Don’t try to predict the market. Position yourself where the market has room to move.
The strategy combines premium selling with technical analysis and disciplined risk management.
The price of the premium determines where the trade can be constructed.
The chart determines the skew.
The Profit Zone is positioned around the market’s path of least resistance.
Delta describes the resulting position—it does not dictate it.
The strategy isn’t about being right about the market’s next move. It’s about constructing a position where several different market outcomes can still produce a profitable trade, while having predefined rules for taking profits, making adjustments, and getting out when the trade no longer makes sense.