
Strategy Source
Creator: Tom King
Published Date: Jun 13, 2023
Link: How to Trade the 111 Strategy – Complete Guide to the 111 Trade
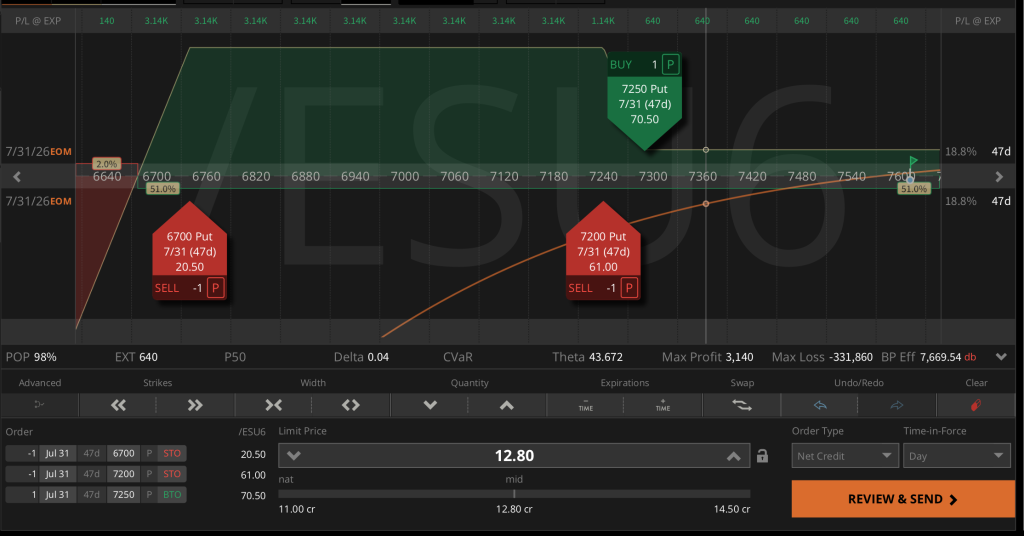
Trade Setup
The “111” strategy is a mechanical, credit-based income trade. You initiate the position by buying an out-of-the-money (OTM) put debit spread and financing it by selling a naked put at a strike price further OTM. The goal is to collect a net credit that covers the cost of the debit spread entirely.
| Action (Sell (-)/Buy (+)) | Leg | DTE | Strike Price | Width |
| Buy (+) | Long Put | 45-60 | Lower Strike | Variable |
| Sell (-) | Short Put | 45-60 | Higher Strike | Variable |
| Sell (-) | Naked Put | 45-60 | Far OTM Strike | N/A |
- Total Capital Required: Margin requirement varies by underlying. The creator caps risk at 2% of total portfolio value per trade and limits strategy allocation to 30% of total portfolio.
- Execution Context: The video uses theoretical models and historical backtesting examples on ES Futures, SPY, and Oil (CL) to illustrate the strategy mechanics.
Strategy Application
This strategy is an income-generating tool that uses the collected premium as a semi-hedge against market downturns.
- Strike Selection: The creator selects strikes based on Width and Credit rather than specific Delta targets:
- Large Underlyings (e.g., ES/SPX): Look for a 30- to 50-wide put debit spread, aiming to pay roughly $6–$10 in debit, then sell a naked put further OTM to collect at least $11–$20 in credit to ensure a net credit.
- Small Underlyings (e.g., SPY): Use a 5-wide spread for a $1 debit and aim to collect $2 in credit on the naked put (collecting twice the debit cost).
- Buffer Zone: The gap between the current market price and the naked put provides a 6% to 10% downside cushion before the trade experiences structural stress.
- Time Differential: The creator moved from 45 days to expiration (DTE) to 60 DTE. The longer duration helps mitigate Gamma (accelerated risk near expiration) and provides better premium collection.
Risk Profile
- Wing Widths: The risk is defined by the distance between the short put of the debit spread and the far-OTM naked put.
- The Greeks: * Delta: The trade starts with a slight positive Delta (bullish bias). If the market moves up, the position performs well. If the market drops, the Delta can turn negative, which—if within the “trap”—actually increases profit.
- Theta: This is a positive Theta trade, meaning “time decay” works in your favor to erode the value of the short options.
- Vega: The trade has negative Vega. A significant spike in “volatility risk” (implied volatility) will increase the cost of your short puts, which is detrimental to the trade’s current value.
- Gamma: Near expiration, the “accelerated risk” can be high if the market price drops rapidly toward your short strikes.
- Assignment Risk: If the market drops significantly past your naked put, you face potential assignment. The creator views this as an opportunity to purchase the underlying at a 10% discount rather than a failure, provided you have the capital to manage the shares.
Expected Outcome
1. The “Tail” (Your Base Win)
If the underlying stays flat or moves higher, the position expires in the “tail.” You keep the net credit received at entry. This is the baseline income zone.
2. The “Trap” (Max Profit Zone)
If the market sells off 5% to 10% and settles within the “trap” (the gap between your spread and the naked put), you keep your initial credit plus the full width of the debit spread. This can result in profits 4x to 6x larger than the initial credit.
Management & Exit Triggers:
- Primary Target: Exit at expiration for max profit in the “Trap,” or close early when the short strikes reach a Delta of 10 or less.
- Defensive Stop Loss: Close the entire trade if the loss reaches 1x the maximum profit potential of the trade.
- Dynamic Management: If the market rallies, you can close the naked put at a 90-95% winner, leaving the put debit spread as a “free” hedge.
Do you need clarification on any other specific mechanics mentioned in the video, or would you like to explore the “112” strategy briefly mentioned by the creator?