
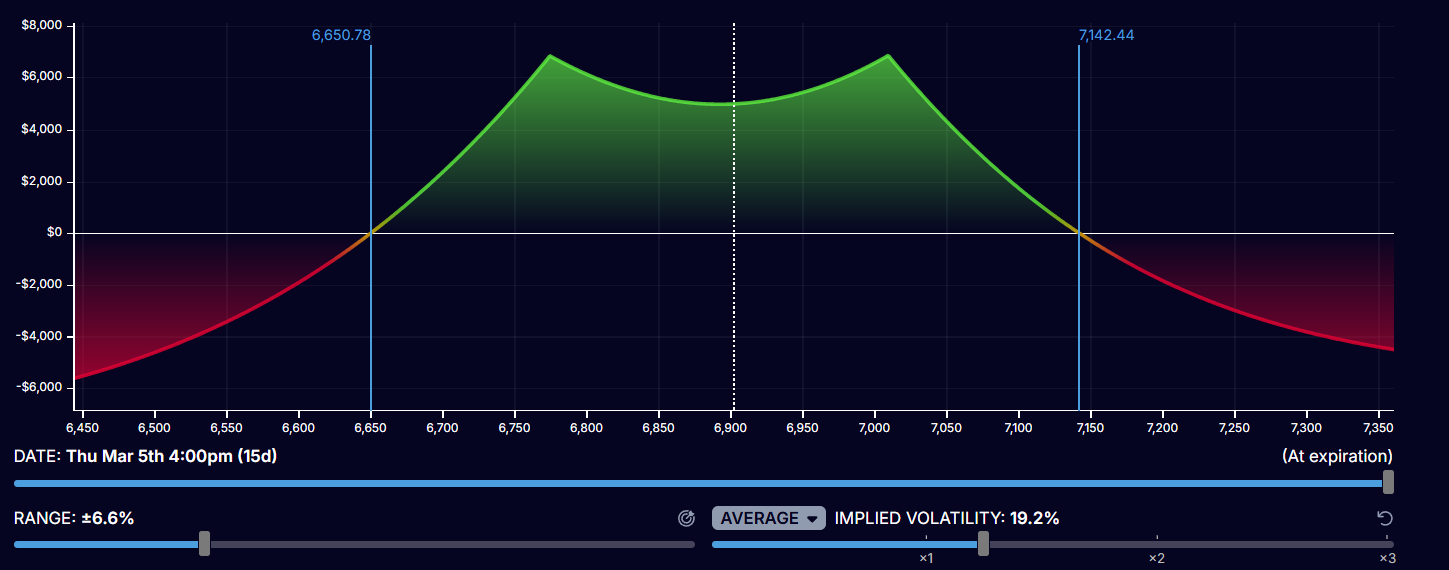
This section defines our Kill Zones. Because our strategy relies on a hard 25% stop-loss without adjustments, we must understand the physical distance (in SPX points) between a “winning” environment and a mandatory exit.
1. The Geometry of our 30 Delta Tents
Our Double Calendar creates a “Volatility Range.” By selecting 30 Delta strikes, we are effectively placing our profit peaks at the edges of the Expected Move.
- The Valley (Neutral): The area between our Put and Call strikes. Here, Delta is low, and we are “collecting rent” via Theta.
- The Tents (The Peaks): Our highest profit potential occurs if SPX settles exactly on our 30 Delta strikes near expiration.
- The Cliff (The Stop Zone): The area beyond our strikes where the trade’s value begins to collapse into our 25% hard stop.
2. Our Proximity Matrix (The 25% Threshold)
In a neutral volatility environment, we can map out our survival based on Standard Deviation (SD). This table shows how much “room” we have to breathe.
| Price Move (SPX) | Distance in SD | P/L Impact | Our Tactical Status |
| 0 to 0.5 SD | Within the Valley | 🟢 +5% to +15% | Safe Zone. Theta is our primary driver. |
| 0.5 to 0.9 SD | Climbing the Tent | 🟡 0% to -15% | Observation Zone. Delta is increasing. |
| 0.9 to 1.2 SD | The “Peak” of Tent | 🟠 -15% to -24% | Alert Zone. Nearing the 25% exit. |
| > 1.2 SD | Over the Cliff | 🔴 -25% | EXIT ZONE. Mandatory hard stop triggered. |
3. The Math: “How Many Points Do We Have?”
To make this practical for our daily monitoring, we translate Standard Deviation into Expected Move (EM).
- Our Coverage: A 30 Delta Double Calendar typically covers 1.2x the 15-day Expected Move.
- The Buffer: If SPX stays within the EM predicted by the options market, our trade has a high probability of success.
- The Breach: If SPX moves beyond 1.2x the EM, our Short legs (15 DTE) gain value faster than our Long legs (30 DTE) can offset them. At this point, the Gamma risk accelerates, and we hit our 25% stop.
4. The “Vol Correlation” Variable
Our 25% stop is not a fixed price point; it is a dynamic value. Volatility acts as a shock absorber or an accelerator for our stop-loss proximity:
The Downside Move (SPX Down / VIX Up)
- The Effect: When SPX drops, volatility usually spikes. Since we are Long Vega, our Long legs gain value.
- Our Result: This “inflates” our Put tent, often allowing us to survive a 1.5 SD move before hitting the 25% stop. Volatility buys us more room on the downside.
The Upside Move (SPX Up / VIX Down)
- The Effect: When SPX rallies, volatility usually drops (Vega crush).
- Our Result: This “shrinks” our Call tent. We might hit our 25% stop on a smaller move (only 0.8 to 1.0 SD) because the price is moving against us and our volatility protection is vanishing.
5. Live Calculation Example: Mapping the Fence
Assume SPX is at 5,000 and the 15-day EM is +/- 100 points.
- Identify the Tents: Our 30 Delta strikes will typically be near 4,900 and 5,100.
- Calculate the 1.2x Boundary: $100 \times 1.2 = 120$ points.
- The Kill Zones: 4,880 on the downside and 5,120 on the upside.
| 15-Day EM (Points) | Safe Zone (Valley) | Warning Zone (Peak) | Kill Zone (Hard Stop) |
| 50 pts | +/- 25 pts | +/- 45 pts | +/- 60 pts |
| 100 pts | +/- 50 pts | +/- 90 pts | +/- 120 pts |
| 150 pts | +/- 75 pts | +/- 135 pts | +/- 180 pts |
6. Why the 25% Hard Stop is Final
Our backtesting is clear on why we do not “wait and see” once the 25% threshold is hit:
- Probability Collapse: Once a trade hits -25%, the chance of it returning to even before the 15-day expiration drops to roughly 12%.
- Gamma Acceleration: Beyond -25%, our “Delta” becomes unmanageable. The losses will move from -25% to -50% twice as fast as they moved from 0% to -25%.
- Capital Efficiency: By taking the 25% hit, we preserve 75% of our capital to deploy into a fresh “Green Flag” setup.
🚩 Section Summary: The “Safety Margin”
- Standard Move: We can typically afford a 2.2% move in SPX before exiting.
- The Vol Trap Penalty: If we ignore our Vol Trap filters and enter in Contango, our safety margin is cut by nearly 50%. We will hit our 25% stop on a much smaller price move.